When a CTO Decides to Make a Wedding Website
An open-source, responsive, Django-powered wedding website and invitation + guest management system with 250+ commits, unit tests and more.
When my wife and I got married in the summer of 2016 I decided I wanted to make our own wedding website from scratch.
Why not just use something like Wedding Wire or Squarespace you ask?
Mostly because I thought it would be a fun little side project. As a seasoned web developer (at the time I was CTO of Dimagi) I like building things and this seemed like a good opportunity to spend a couple days throwing together some HTML and CSS and giving it a truly personal touch.
Of course, faster than you can say "scope creep" one thing led to another and soon I had built a rather siginficant application that included:
- A responsive, single-page traditional wedding website
- A complete guest management application
- Email framework for sending save the dates
- Email framework for invitations and built in RSVP system
- A live guest dashboard
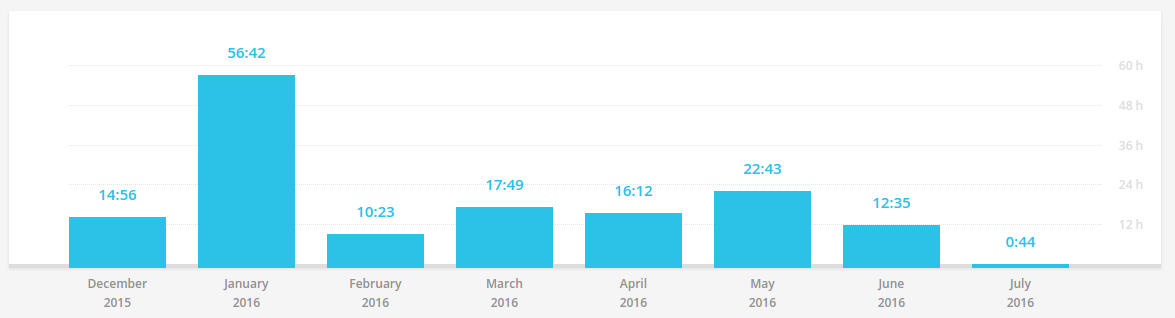
18 months and 250 commits later I thought it would be fun to write a bit about the project and share it with the world.
If you just want to see the code you can grab it on github.
The Static Wedding Website
At first the plan was just to make your standard, run-of-the-mill wedding website. You know the standard "here's our engagement story" and "here's the event information" type of stuff.
At the time I had a lot of experience making Django sites and not a lot of experience with other frameworks so I decided to just make the site in Django even though I wasn't sure I needed a backend. If I was only making a static wedding website a better choice would probably have been a static site generator, but in the back of my mind I think I knew I wanted to do more with the project.
For the site, I knew I wanted it to be visually appealing—at least as visually appealing as a design impaired backend developer like myself could muster—and mobile friendly. I also knew I wanted a single page app because those were all the rage. I ultimately decided to use Twitter Bootstrap and modified a free theme to meet my liking.
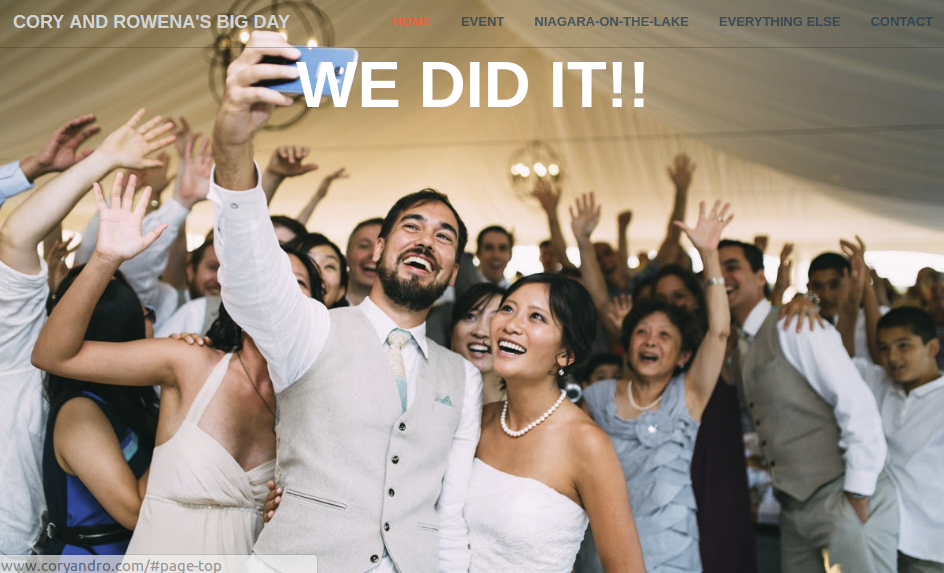
This was all pretty standard HTML/CSS/JS/Bootstrap3 stuff so I won't bore you with the details. If you want to see the finished product you can do that on our live site.

How Feature Creep Starts
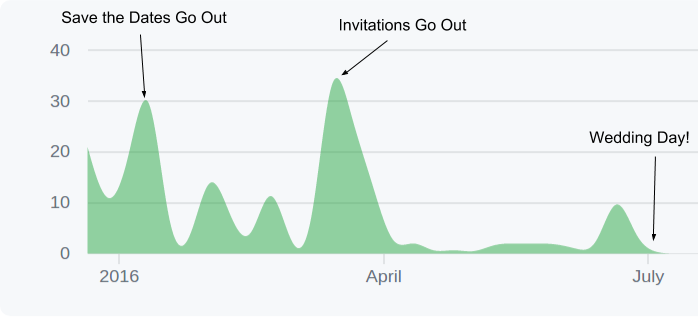
When we started thinking about our save-the-dates the first decision we made was to send them electronically. This seemed more efficient, more cost effective, more eco-friendly, and way, way easier than trying to get all of our friends' and family's addresses and mailing things by hand (especially from our new home in South Africa!).
Like many possibly bad decisions this one started with five very simple words: "wouldn't it be cool if...?"
In our case the phrase was "wouldn't it be cool if instead of using something like evite or paperless post we sent out the save the dates ourselves? Then we could do something much more personalized and fun, like sending different versions to different people."
Hmm, I thought. That sounds pretty simple. We just need to make a few email templates, and then all we need is a list of all our guests and their email addresses lists and then we could just—either randomly or explicitly—assign them to a template and send it off.
Sounds like a super simple model with a name, and email and then some other tracking properties. I bet I can whip that up in an hour.
Enter the Guest Model
If we were going to be sending emails to our guests we'd need to keep track of them. Fortunately, since I had chosen to use Django this was as simple as making a database model.
Here's my first crack at the Guest model.
class Guest(models.Model):
    name = models.TextField()
    email = models.TextField()
    save_the_date_sent = models.BooleanField(default=False)
    save_the_date_opened = models.BooleanField(default=False)
    invited = models.BooleanField(default=False)
    attending = models.NullBooleanField(default=None)
Name, email, two fields to track whether we had sent the save the date and whether they'd opened it (a feature that was built later).
Also a field to track whether they were officially invited—at the beginning we had some people who were on the fence (sorry crazy Aunties!)—and
whether they were attending.
Unlike the others, attending used a NullBooleanField instead of a BooleanField so we could represent the absence of information with None.
Easy-peasy.
Additional Creep: It's Party Time
The Guest model was an ok start, but soon we had a problem: what about people whose emails we didn't have?
Or people who didn't even have email like my brothers' kids? We needed a way to represent these people but we couldn't track their responses individually.
Thus came the Party model—to help represent a collection of Guests.
I bumped most of the metadata up from the Guest model to the Party and just left name, email, and is_attending on the Guests.
I also decided to split out first and last name at this stage—I think mostly to match the format we had in our guest spreadsheet.
We also decided to add a "type" to the party field to represent whether our guests were "formal" or "fun"—since we wanted to send
different save the dates to each crowd.
Here's the updated versions of the Guest and Party models:
# these will determine the default formality of correspondence
ALLOWED_TYPES = [
    ('formal', 'formal'),
    ('fun', 'fun')
]

class Party(models.Model):
    """
    A party consists of one or more guests.
    """
    name = models.TextField()
    type = models.CharField(max_length=10, choices=ALLOWED_TYPES)
    save_the_date_sent = models.DateTimeField(null=True, default=None)
    save_the_date_opened = models.DateTimeField(null=True, default=None)
    is_invited = models.BooleanField(default=False)
    is_attending = models.NullBooleanField(default=None)

class Guest(models.Model):
    """
    A single guest
    """
    party = models.ForeignKey(Party)
    first_name = models.TextField()
    last_name = models.TextField(null=True, blank=True)
    email = models.TextField()
    is_attending = models.NullBooleanField(default=None)
Guest Importer
We had previously been tracking our guest list in a Google Sheet, and there was no way we were going to re-enter all those guests by hand. We needed an importer.
I ended up making a pretty basic and dumb csv processor, though one important thing about it was that it was idempotent—meaning it could be run safely multiple times in a row. We were still modifying our guest list in Google Sheets needed to be able to continually import it on top of the existing database. Since it seemed important for this part to be error-free I also decided to add some unit tests using a set of sample guests from Game of Thrones.
class GuestImporterTest(TestCase):

    @classmethod
    def setUpClass(cls):
        super(GuestImporterTest, cls).setUpClass()
        cls.path = os.path.join(os.path.dirname(__file__), 'data', 'guests-test.csv')

    def test_import(self):
        import_guests(self.path)
        self.assertEqual(2, Party.objects.count())
        self.assertEqual(4, Guest.objects.count())
        the_starks = Guest.objects.filter(party__name='The Starks')
        self.assertEqual(3, the_starks.count())

    def test_import_idempotent(self):
        for i in range(3):
            import_guests(self.path)
            self.assertEqual(2, Party.objects.count())
            self.assertEqual(4, Guest.objects.count())
            the_starks = Guest.objects.filter(party__name='The Starks')
            self.assertEqual(3, the_starks.count())
Finally Ready to Start on Save the Dates
After getting the models to a state where they could support everything we wanted to do it was finally time to start working on our save the dates.
The first step involved finding an email template that would work across clients—a problem that is notoriously painful. My wife (also a former web developer) found one on litmus.com and customized it to our needs.
Since we wanted to send different templates to different guests we had to extract out the pieces of the template we wanted to customize. Eventually we ended up with a single template with a few customizable pieces: a header image, a main image, a background color, and a text color. It's quite a lot of messy compatibility code so I won't paste it here, but all the templates are on github here.
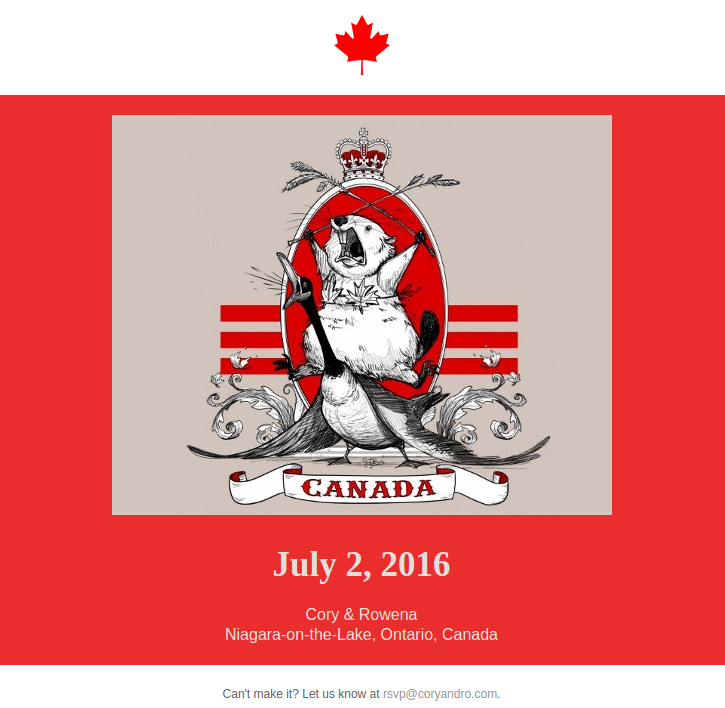
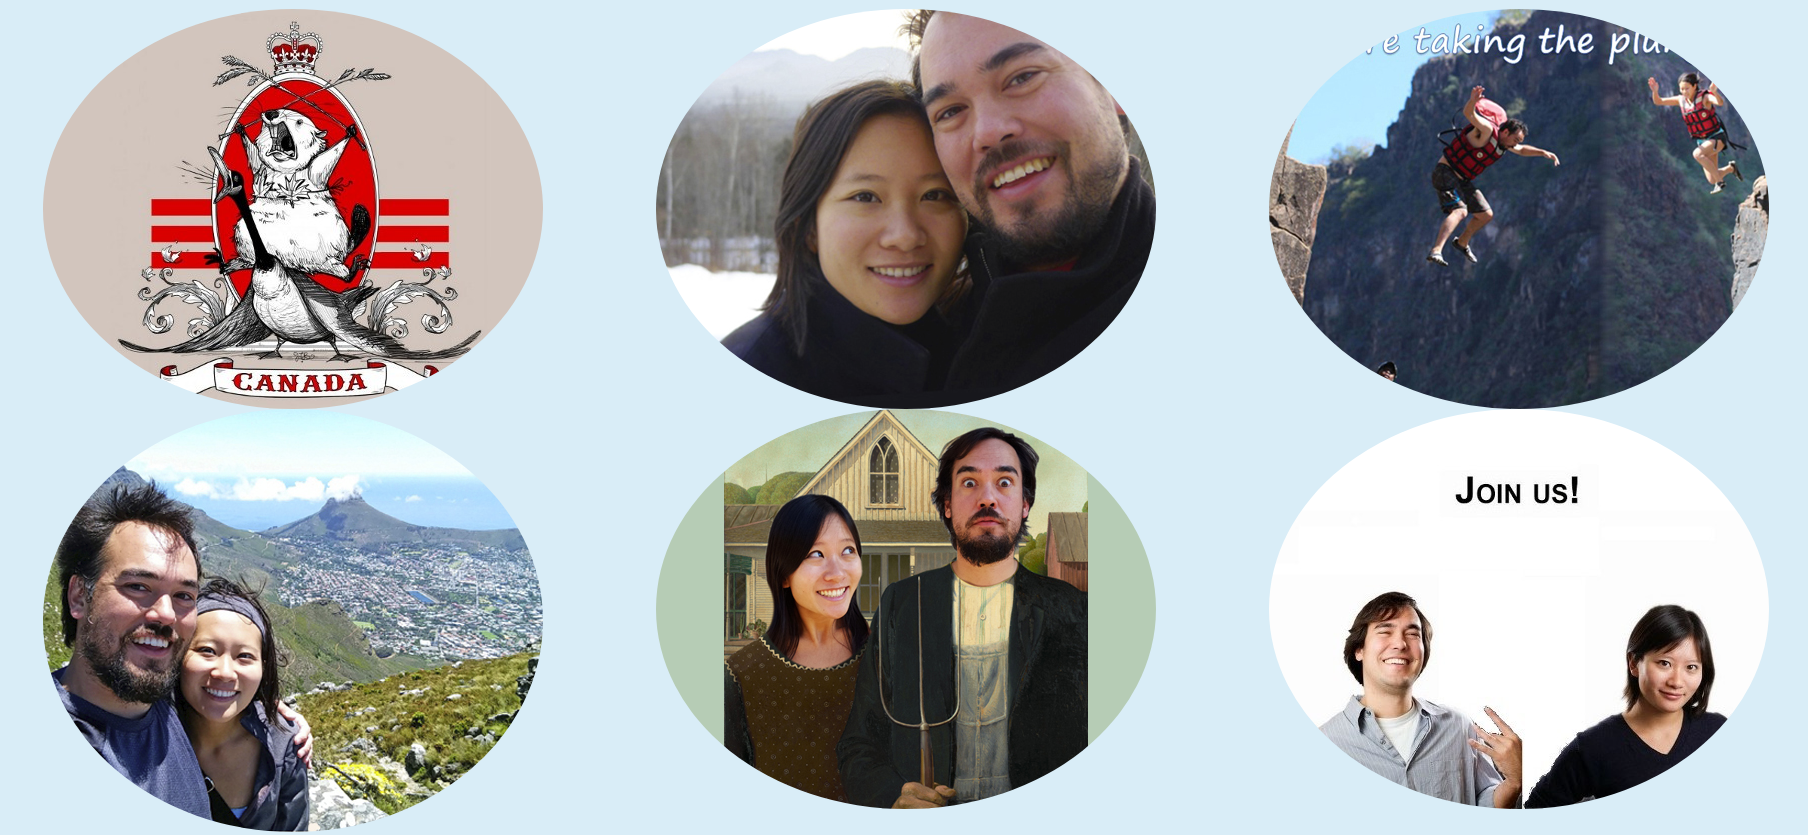
We brainstormed a few different template ideas together and eventually came up with six—two "standard" ones with nice photos of us, 3 that were more silly/fun and one that was an inside joke that would only be relevant to people who worked for our company.
Once we had this infrastructure in place we just added all our save the dates to a list containing the various configurable properties, and wrote a bit of code to insert these values into a shared template:
SAVE_THE_DATE_CONTEXT_MAP = {
    'lions-head': {
        'title': "Lion's Head",
        'header_filename': 'hearts.png',
        'main_image': 'lions-head.jpg',
        'main_color': '#fff3e8',
        'font_color': '#666666',
    },
    'canada': {
        'title': 'Canada!',
        'header_filename': 'maple-leaf.png',
        'main_image': 'canada-cartoon-resized.jpg',
        'main_color': '#ea2e2e',
        'font_color': '#e5ddd9',
    },
    # other templates omitted for brevity
}
Then we wrote a simple function to choose a template semi-randomly based on our defined criteria (which you can see in the comments):
def get_template_id_from_party(party):
    if party.type == 'formal':
        # all formal guests get formal invites
        return random.choice(['lions-head', 'ski-trip'])
    elif party.type == 'dimagi':
        # all non-formal dimagis get dimagi invites
        return 'dimagi'
    elif party.type == 'fun':
        all_options = SAVE_THE_DATE_CONTEXT_MAP.keys()
        all_options.remove('dimagi')
        if party.category == 'ro':
            # don't send the canada invitation to ro's crowd
            all_options.remove('canada')
        # otherwise choose randomly from all options for everyone else
        return random.choice(all_options)
    else:
        return None
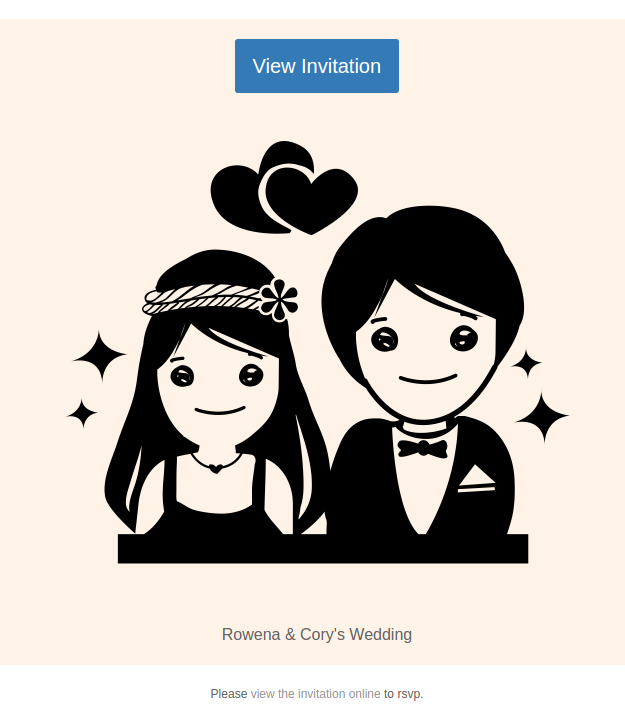
As a final step before sending we decided to also make the landing page of our site a randomly selected save-the-date (since everyone would only be getting one template and we wanted people to see the others). We eventually moved this page here (if you refresh you will get a new one).
def save_the_date_random(request):
    template_id = random.choice(SAVE_THE_DATE_CONTEXT_MAP.keys())
    context = get_save_the_date_context(template_id)
    context['email_mode'] = False
    return render(request, SAVE_THE_DATE_TEMPLATE, context=context)
You can see the final set of save the dates below.
Finally we wrote a management command to handle the actual sending which called a function that looks something like this:
def send_all_save_the_dates(test_only=False, mark_as_sent=False):
    to_send_to = Party.in_default_order().filter(is_invited=True, save_the_date_sent=None)
    for party in to_send_to:
        send_save_the_date_to_party(party, test_only=test_only)
        if mark_as_sent:
            party.save_the_date_sent = datetime.now()
            party.save()
After a lot of testing we were confident everything was good to go and it was time to push the big scary "send" button
(or in this case run ./manage.py send_save_the_dates --send --mark-sent).
Almost immediately we started getting some fun responses from our friends talking about the save the dates and it was fun watching them get confused about describing different templates.
All in all, thanks to thorough testing and preparation it was a great success!
Though I should note that, probably not surprisingly, the whole thing took quite a bit longer than expected. And we were just getting started!
Invitations
After a couple months of much appreciated down time, the three-month-out deadline when you are supposed to send out invitations started approaching. Feeling overall good about the save the date experience we decided once again to do the invitations and RSVPs ourselves. This added quite a lot of additional scope. In particular we decided we wanted to:
- Be able to track invitation opens
- Let people RSVP on our website
- Not require people to login or enter their emails
- Automatically populate the guest names from the invitation link
- Let people select meals and specify attendance for each guest
Updating the Models
All this extra functionality meant another significant model update.
Here are the final Party and Guest models after the invitations were done:
class Party(models.Model):
    """
    A party consists of one or more guests.
    """
    name = models.TextField()
    type = models.CharField(max_length=10, choices=ALLOWED_TYPES)
    category = models.CharField(max_length=20, null=True, blank=True)
    save_the_date_sent = models.DateTimeField(null=True, blank=True, default=None)
    save_the_date_opened = models.DateTimeField(null=True, blank=True, default=None)
    invitation_id = models.CharField(max_length=32, db_index=True, default=_random_uuid, unique=True)
    invitation_sent = models.DateTimeField(null=True, blank=True, default=None)
    invitation_opened = models.DateTimeField(null=True, blank=True, default=None)
    is_invited = models.BooleanField(default=False)
    rehearsal_dinner = models.BooleanField(default=False)
    is_attending = models.NullBooleanField(default=None)
    comments = models.TextField(null=True, blank=True)

class Guest(models.Model):
    """
    A single guest
    """
    party = models.ForeignKey(Party)
    first_name = models.TextField()
    last_name = models.TextField(null=True, blank=True)
    email = models.TextField(null=True, blank=True)
    is_attending = models.NullBooleanField(default=None)
    meal = models.CharField(max_length=20, choices=MEALS, null=True, blank=True)
    is_child = models.BooleanField(default=False)
The most important change was the addition of the invitation_id to the Party model.
This was a 32-character GUID that we used in our invitation URLS to prevent people from being able to guess others' invite links
(which would have been easy if we had used standard integers).
The invitation_id also solved the problem with allowing guests to RSVP without requiring logins;
each party would simply have a unique invitation ID that only they would know that could be used to RSVP.
In addition to the invitation_id, Parties also got some metadata about when the invitations were sent and opened and
a comments field for our guests to put in well-wishes.
Meanwhile Guests got two more fields related to the RSVPs—one for meal selection, and another to represent whether they were a child or not.
We had to add this last field because we didn't want to offer meal selection to children, and it also helped us plan our final headcounts and costs better.
Invitation Email and Open Tracking
We were originally going to implement a tracking pixel in the invitation emails to see whether they were being opened or not, but eventually ended up with a simpler approach. We decided instead to make our actual invitation email a "teaser" that linked you to the "real" invitation—which was your personalized link and RSVP page. Then, since our invitations already were individualized links per-party, we just decided to treat the opening of that link as the opening of the invitation.
Once this was decided it was quite easy to just add a bit of code to update the tracking field when the page was opened for the first time.
def invitation(request, invite_id):
    party = guess_party_by_invite_id_or_404(invite_id)
    if party.invitation_opened is None:
        # update if this is the first time the invitation was opened
        party.invitation_opened = datetime.utcnow()
        party.save()
For the email itself, we ended up using basically the exact same template as the save the dates only this time the email had to be smart about injecting the right link into the mail based on who it was being sent to—a straightforward process with Django's template rendering.
The Invitation and RSVP Page
The invitation/RSVP page (example here) was pretty straightforward (I'm more of a backend developer so had to keep things quite simple on the UI side).
Basically it consists of a short embedded video that we made, some event details, and an RSVP form. The trickiest bit was the validation and meal logic, which was as follows:
- You must RSVP for all guests in your party
- You are only allowed to select a meal if you RSVP "yes"
- Kids don't have meals
I used the excellent Validator for Bootstrap 3 library for the UI and most of the javascript logic, and just had to add a manual bit of JavaScript to hook up the attendance/meal workflow:
$(function () {
    // enable/disable meal choices based on attendance
    $("input.attending-radio").change(function (e) {
        var target = $(e.target);
        if (target.closest('.form-group').data('is-child') === "True") {
            // don't attempt to update meals for children, who don't have them.
            return;
        }
        var value = target.attr('value');
        var mealButtonContainer = target.closest('.form-group').next('.form-group');
        var mealButtons = mealButtonContainer.find('[type=radio]');
        if (value === 'yes') {
            mealButtonContainer.removeClass('text-muted');
            mealButtons.each(function (index, button) {
                button.disabled = false;
                button.required = true;
            });
        } else if (value === "no") {
            mealButtonContainer.addClass('text-muted');
            mealButtons.each(function (index, button) {
                button.checked = false;
                button.disabled = true;
                button.required = false;
            });
        }
        // reload validation
        $(document.forms[0]).validator('destroy');
        $(document.forms[0]).validator();
    });
});
Here's what this part looked like:
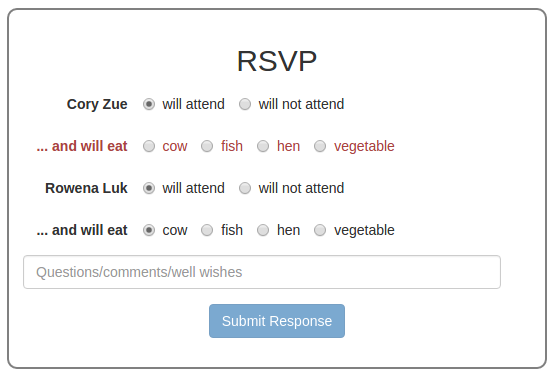
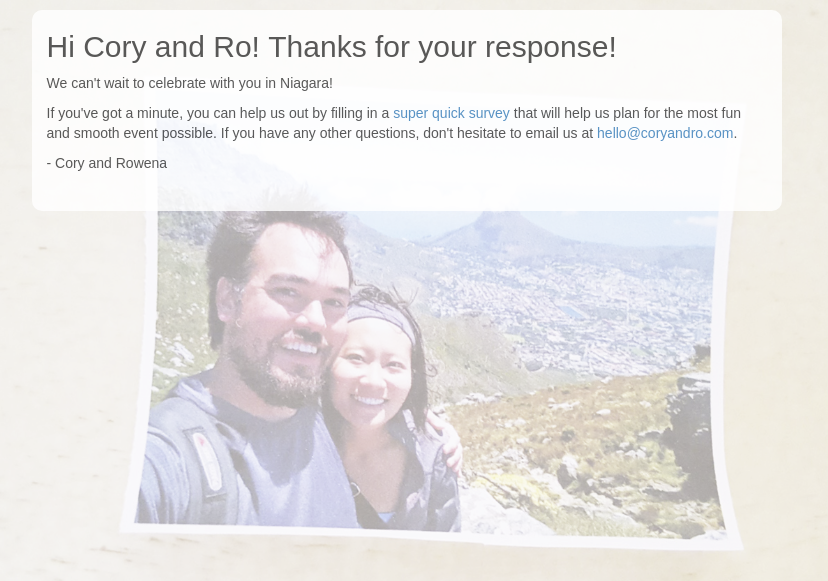
Finally, after you submit your form—which, of course updates your attending and meal preferences accordingly—we took you to a customized confirmation page with a thank you and a few other bits of information.
Sending the Invitations
Once again everything went incredibly smoothly thanks to thorough testing and running through several dry runs before actually sending the real invitations. There were actually 0 bugs encountered by our guests during the RSVP process, a fact I am quite proud of.
On the flip side, at this point I had put in well over 40 hours of time on nights and weekends building the site.
The Final Piece: a Live Guest Dashboard
Once we had the invitations going out and the RSVPs coming in, the final thing we wanted was a dashboard to track the progress everything. This ended up being quite simple—just a few aggregate numbers and lists of people who hadn't responded or seen the invitation so we could follow up with them directly.
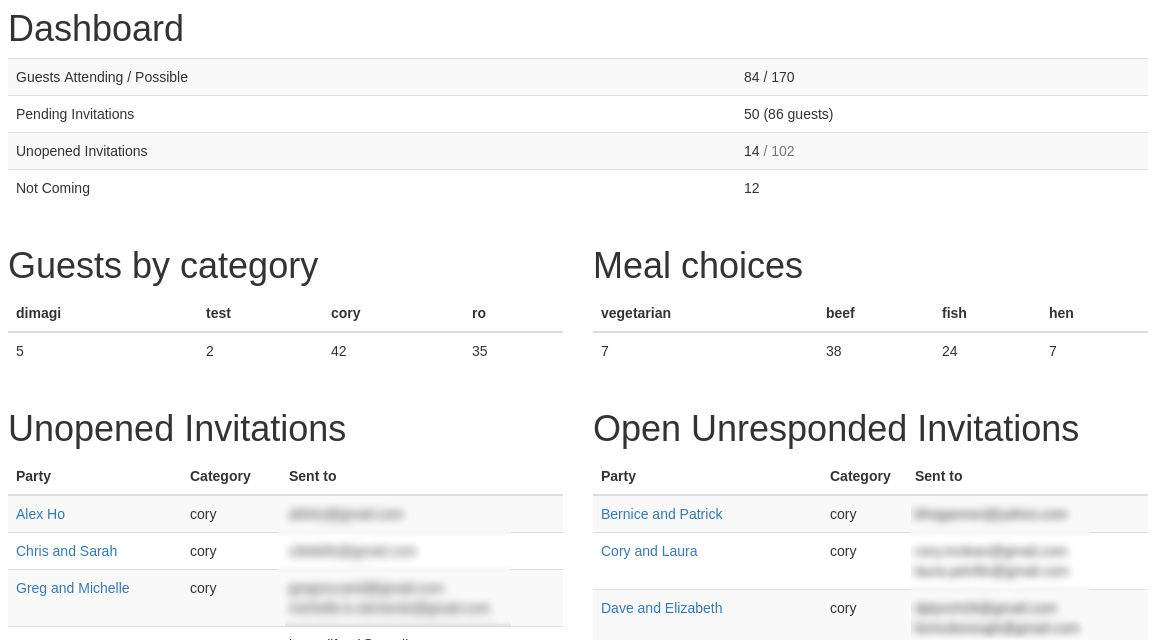
@login_required
def dashboard(request):
    parties_with_pending_invites = Party.objects.filter(
        is_invited=True, is_attending=None
    ).order_by('category', 'name')
    parties_with_unopen_invites = parties_with_pending_invites.filter(invitation_opened=None)
    parties_with_open_unresponded_invites = parties_with_pending_invites.exclude(invitation_opened=None)
    attending_guests = Guest.objects.filter(is_attending=True)
    guests_without_meals = attending_guests.filter(
        is_child=False
    ).filter(
        Q(meal__isnull=True) | Q(meal='')
    ).order_by(
        'party__category', 'first_name'
    )
    meal_breakdown = attending_guests.exclude(meal=None).values('meal').annotate(count=Count('*'))
    category_breakdown = attending_guests.values('party__category').annotate(count=Count('*'))
    return render(request, 'guests/dashboard.html', context={
        'guests': Guest.objects.filter(is_attending=True).count(),
        'possible_guests': Guest.objects.filter(party__is_invited=True).exclude(is_attending=False).count(),
        'not_coming_guests': Guest.objects.filter(is_attending=False).count(),
        'pending_invites': parties_with_pending_invites.count(),
        'pending_guests': Guest.objects.filter(party__is_invited=True, is_attending=None).count(),
        'guests_without_meals': guests_without_meals,
        'parties_with_unopen_invites': parties_with_unopen_invites,
        'parties_with_open_unresponded_invites': parties_with_open_unresponded_invites,
        'unopened_invite_count': parties_with_unopen_invites.count(),
        'total_invites': Party.objects.filter(is_invited=True).count(),
        'meal_breakdown': meal_breakdown,
        'category_breakdown': category_breakdown,
    })
We actually used the dashboard a lot! It was a great place to see our planned attendance numbers, meal counts, and the lists of people we needed to follow up with to get RSVPs.
"I found it super, super helpful to know the max possible # of attendees since we need to provide the venue those numbers and there are significant cost implications."
—My wife, Rowena
Conclusion
If you made it this far you've hopefully learned a few things about Django, the type of work that goes into building something like this, and how scope quickly creeps into even the simplest of things.
If you're interested in using the project for your own wedding, don't hesitate to get in touch! Everything is on Github and I'm happy to work with people to make it more open-source friendly.
Thanks for reading!
—Cory
p.s. If you're interested in Django projects you can sign up below to get content like this in your inbox whenever I publish it.
About Me
I'm the former CTO of Dimagi, where I led the team that makes CommCare HQ—one of the larger Django codebases I'm aware of—for 6 years. I've been developing Django apps since 2007.
I'm currently trying to launch side projects, including an app to make printable place cards online and a Chrome extension to personalize your new tab screen with your own photos.
If you'd like to follow along as I write about the journey of building and marketing products on the internet you can find out more on my website, or follow me on Medium.